Light-catching contrast
A bright foil can give a mirror-like highlight that changes as the garment moves. It is useful when a logo or graphic should catch the eye through reflection as well as colour.
Review the finish in direct and soft light.
Jiashun / The printing workshop
Make the light part
of your design.
Metallic graphics for custom T-shirts, hoodies and streetwear. Bring your artwork; develop the foil finish with your fabric, placement and garment.
Custom decoration, developed with your garment.
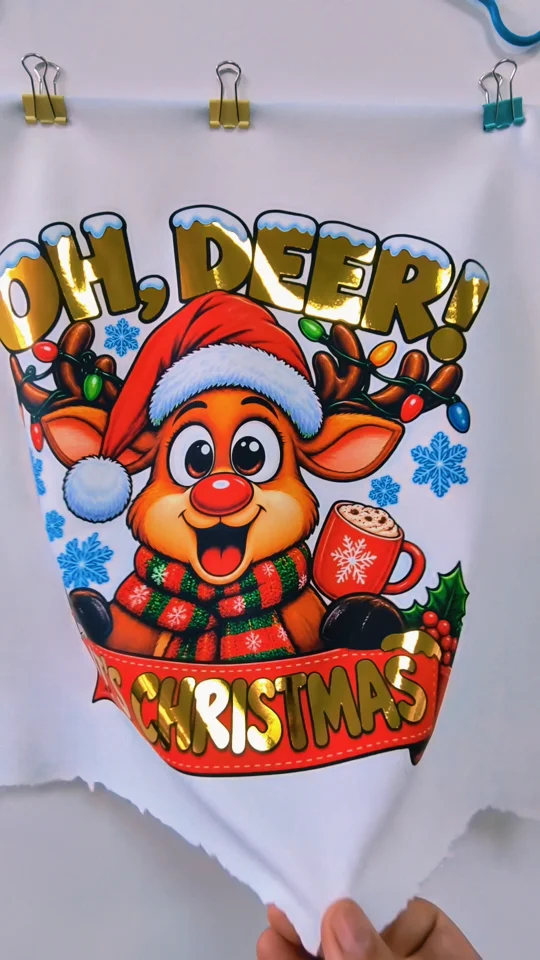
A colour graphic.
A metallic accent.
A shift in the light.
Gold lettering over a colour graphic. Watch the carrier lift and the reflection change.
01 / Understand the technique
Foil printing transfers a thin decorative layer onto fabric using an adhesive and heat. In a metallic finish, the reflection comes from that transferred layer. The adhesive defines where the design appears.
A decorative foil layer bonds to adhesive on the fabric. The carrier sheet is peeled away.
Simplified cross-section / layers are not to scale.A bright foil catches light across its surface, creating a more mirror-like appearance than an ordinary flat ink colour. Against a matte garment, even a compact graphic can become the focal point.
Screen printing can be used to apply the foil adhesive. A foil print and a screen-printed graphic are therefore not always separate production routes: one can be part of the other.
For a design brief, specify the finish you want first: a reflective metallic surface, a softer ink effect or a raised texture. That gives the sample a clear target.
See the printing comparison ↓A bright foil can give a mirror-like highlight that changes as the garment moves. It is useful when a logo or graphic should catch the eye through reflection as well as colour.
Review the finish in direct and soft light.
Foil follows the adhesive artwork, so a small wordmark, outline or selected part of a larger design can carry the effect. The surrounding fabric remains visible wherever there is no design.
Start with the elements you want to emphasise.
The decorative foil layer is thin. The adhesive build and area of coverage still affect the feel of the print, so a small chest mark and a large solid back panel should be assessed separately.
Check flexibility and drape on the whole garment.
Silver, coloured metallics and patterned foils offer other directions. Distressed artwork can deliberately break up the reflection. The foil material and application determine the result.
Match a physical foil sample, not just a colour on screen.
A closer look / Sample 02
The whole graphic doesn’t have to shine.
In this fabric sample, small gold hearts and selected details add reflection around a colourful illustration. The contrast lets the metallic areas stand out without taking over the artwork.
Mark the letters, outlines or accents you want to catch the light.
Plan the metallic areas alongside the rest of the printed graphic.
Look at the sample flat, bent and under changing light.
02 / Set the direction
Start with the look you want. These graphic illustrations show finish directions; available colours and the final effect are confirmed through sampling.
A warm metallic direction for a chest mark, bold lettering or a statement graphic.
Sample checkConfirm the foil shade and reflectivity against the actual fabric colour.
A cool metallic direction for graphic contrasts and crisp, open shapes.
Sample checkReview coverage and edge definition at the final artwork size.
Intentional breaks in the graphic create a worn metallic appearance.
Sample checkDefine the planned distressing separately from unwanted gaps or peeling.
Choose a direction to include it in your enquiry. Explore finishes ← →
03 / From file to fabric
The production route depends on the artwork and materials. These five stages explain a typical adhesive-and-foil workflow, including the checks that turn a visual idea into an approved garment.
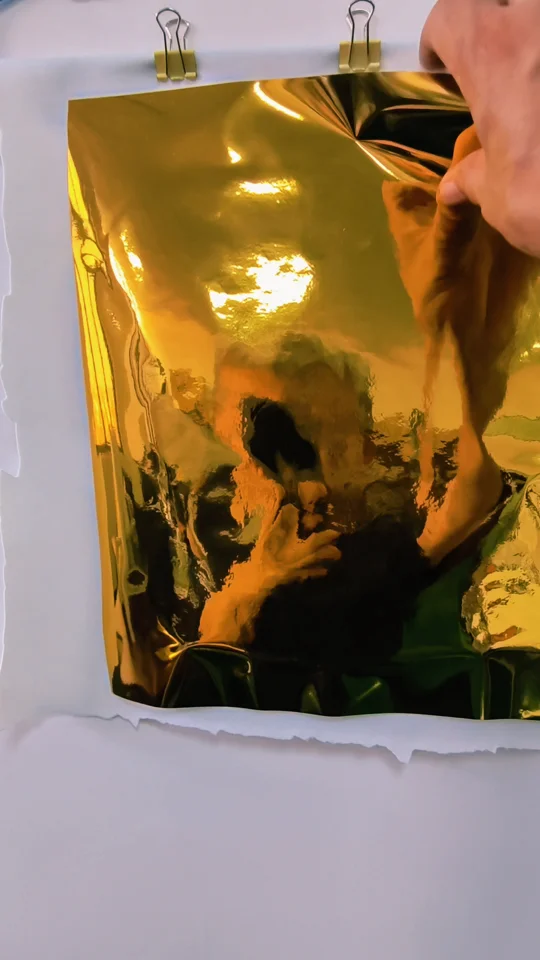 01
The visible sheet is the carrier, before it is peeled away.
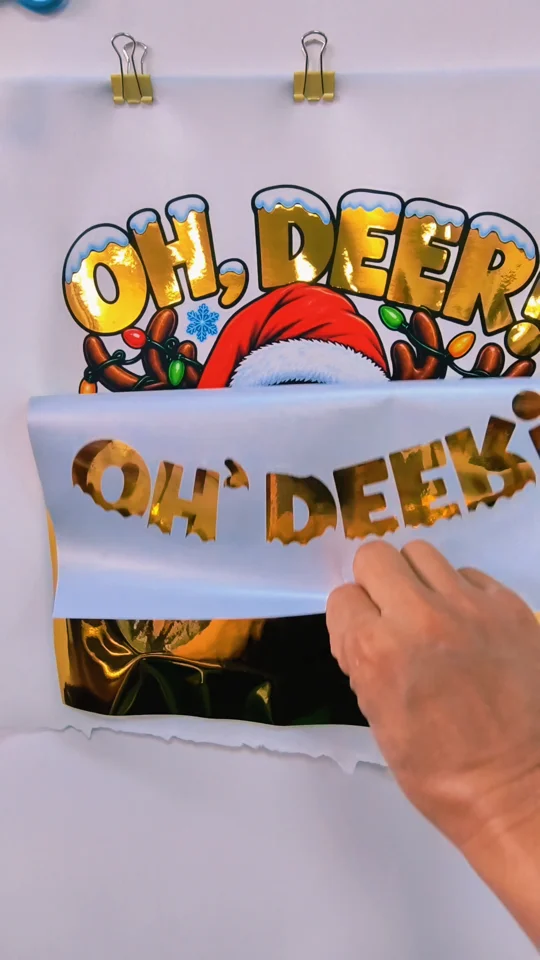 02
Peeling exposes the colour graphic and the selected metallic areas.
03Tilt the fabric and watch highlights move across the lettering.
One fabric sample, three moments. The footage shows peeling and the finished effect; the full production workflow is outlined below.
Set the final size and separate the areas that need foil. Review narrow lines, gaps, seam crossings and planned distressing before making the sample.
A common route screen-prints foil adhesive onto the fabric and dries it as specified. Pre-made adhesive transfers or cut adhesive designs are alternative routes.
Place the compatible foil over the adhesive artwork. The press supplies heat, time and even pressure to transfer the decorative layer. Settings belong to the selected material system.
Remove the carrier at the specified peel temperature. Some systems require complete cooling. The decorative layer remains on the prepared design; the carrier is removed.
Check coverage, edges, placement and feel, then review the agreed wash and stretch tests. Approve the finished garment as the reference for bulk production.
Temperature, pressure, dwell time and peeling instructions vary between foil and adhesive systems. Copying one supplier’s settings to another material can change adhesion and appearance. The selected combination must be tested on the intended garment.
04 / Choose by the result
Reflection, colour detail and raised texture are different design goals. Compare what each method contributes, then judge the feel and durability on a sample made for your garment.
Compare a transferred surface with an ink-based sheen.
For colour detailStart with the illustration, gradients and fabric suitability.
For raised textureMake height and a tactile surface the main feature.
Compare six decoration options. On smaller screens, swipe sideways to read every column.
| Method | Appearance & feel | A useful starting point for | What to review |
|---|---|---|---|
| Foil printingThis finish | A transferred metallic layer; a bright, reflective surface with feel influenced by the adhesive underneath. | Metallic wordmarks, statement lettering and selective light-catching accents. | Foil coverage, edge adhesion, fabric movement and the approved care method. |
| Metallic ink | Metallic particles within a printed ink film. The sheen depends on the formulation; it is not a transferred foil layer. | Gold or silver graphics where an ink-based metallic effect suits the design. | Approve the actual sheen and cure. Metallic ink is not automatically more washable than foil. |
| Standard screen printing | Ink printed through a stencil. Water-based and plastisol systems offer different coverage and handfeel. | Solid-colour logos, repeat graphics and designs with defined colour separations. | Ink choice, colour count, registration and coverage. Ordinary colours do not create a foil surface. |
| DTF transfers | A digitally printed design is heat-transferred from film. Fine detail and full colour are possible without adding metallic foil. | Multicolour illustrations, gradients and detailed logos. | Heat compatibility, transfer edges and feel across large areas. A printed gold tone is not metallic foil. |
| DTG printing | Textile ink is printed directly onto the garment. Pretreatment and white underbase affect the result. | Detailed illustrations and tonal artwork on suitable cotton or cotton-rich garments. | Fabric suitability, garment colour, pretreatment and detail reproduction. Standard inks do not add a foil layer. |
| Puff printing | A puff ink system creates a raised effect. Its main visual feature is volume and rounded texture. | Bold letters and open shapes where a tactile, dimensional finish is the priority. | Raised height, spacing and edge definition. Choose it for texture rather than assuming a metallic result. |
When foil makes sense
Consider foil for a bold wordmark on a dark tee, a selected metallic accent within a larger graphic, or deliberately broken-up lettering for a worn look. Start with a clear shape and approve the effect at its final size.
When to compare another route
For photographic colour, compare DTF or DTG. For a raised surface, compare puff. If stretch or low-maintenance care is the priority, ask to compare tested material systems rather than choosing from appearance alone.
Screen printing is a process family; metallic and puff inks, and some foil adhesives, can all be screen-applied. This comparison describes the intended finish, not a universal price or durability ranking.
Explore the full printing workshop ↗05 / Fabric, wear & care
A foil effect depends on the surface beneath it. Review fabric compatibility first, then inspect the finished print for the way your customer will wear and care for the garment.
Smooth, even surfaces are a useful starting point. Composition, knit structure, finishing and stretch all matter; a successful sample on one fabric does not approve a different fabric.
A useful starting point for a clean foil surface. Check the actual knit, surface fuzz and finish; fibre content alone does not guarantee uniform coverage.
Review the face of the fabric, not only its weight. On fleece or French terry, check the print area, seams and how the completed garment bends and hangs.
Some foil systems support polyester. Confirm heat tolerance and the specific adhesive match; high stretch needs a separate adhesion and movement test.
Compare the print with the approved artwork. Pinholes or missing areas need a review of the fabric surface, adhesive coverage and transfer conditions.
Look for lifted edges, lost small lettering or filled gaps at actual size. Check placement from a fixed point on the garment.
Bend and stretch the printed area as the garment will be worn, then assess it after the agreed wash test. Confirm whether any distressed effect is intentional.
Garment and fabric, artwork dimensions, print locations, foil colour choices and quantities by style and colour. Share your delivery country and target date so the quote covers the complete project.
Explore sample development ↗06 / Your foil printing brief
A tech pack, a logo or a close-up reference is a useful starting point. Tell us what you want to make.
Price, minimum quantity and timing are confirmed after reviewing your brief.
Before you start
Foil printing bonds a decorative foil layer to the fabric through an adhesive and heat application. The adhesive defines the artwork; the foil creates the metallic surface. The exact application sequence depends on the selected materials.
No. Foil printing transfers a separate decorative layer. Metallic ink creates its effect within the printed ink. Send a reference of the reflection and texture you want so the sample can establish the right method.
Suitable adhesive and foil systems can work with cotton, polyester and blends. The actual fabric surface, finish and heat tolerance still need checking. Highly stretchy fabrics need an additional stretch and adhesion review before approval.
Yes, you can request silver or another metallic direction in your brief. Available shades and effects depend on the foil material selected for the project. Confirm the colour from a physical sample rather than a screen swatch.
Follow the approved care label for the foil, adhesive and garment combination. Gentle washing inside out, air drying and avoiding direct ironing on the print are common foil-care recommendations. The final wash temperature and method must be confirmed during sampling; there is no universal wash-count guarantee.
It can if the materials, adhesion or application are unsuitable, or if the finished print is stretched or washed beyond its approved conditions. Check the complete sample after the intended wear and wash tests. A deliberately distressed graphic should be defined in the artwork and approved separately from unwanted damage.
Mixed finishes are possible, but they need a planned application sequence and a compatibility sample. Foil can adhere to areas that were not intended to receive it. Mark the foil area separately and review neighbouring inks, heat exposure and registration before confirming the combination.
A single-colour foil application does not reproduce full-colour photographic shading like a digital print. Halftone or broken-up effects need an artwork review at actual size. For a detailed colour image with a metallic accent, discuss a separate foil area alongside another printing method.
Share the garment and fabric, artwork dimensions, placements, foil colours, quantities by style and colour, delivery country and target date. These details define the setup and production work. Price, minimum quantity and timing are confirmed after reviewing your garment brief.
These manufacturer references explain the processes and material considerations in this guide. They do not establish the specific materials or performance of a Jiashun order.